


When Should You Call in Tongits?
Tongits Call timing can decide a round. Learn when to call Draw, when to wait, how deadwood, melds, sapaw, and opponent behavior affect your decision.
Tongits Call is a timing decision, not a button to press whenever your hand looks light. The goal is simple: Know when your deadwood, meld position, and opponents’ visible cards make calling stronger than taking another turn.
Tongits Call and Call Draw
A Tongits Call normally refers to calling Draw: You are asking to end the round and compare remaining unmatched cards rather than continuing to draw and discard.
That sounds simple until the table gets tight.
You may have only two loose cards left, yet one of them is a Queen. Another player may be holding three unmatched cards worth only six points combined. In that situation, having fewer cards does not automatically mean having the stronger hand.
This is also where Call Draw should be separated from Fight.
- Call Draw: You initiate the showdown.
- Fight: An eligible opponent accepts the challenge instead of folding.
- Tongits: You empty your hand completely through valid combinations and plays.
Mixing those actions together creates poor decisions because each one carries a different risk.
Call Eligibility Comes First
Before thinking about whether a call is smart, make sure it is legal under the rules being used.
Traditional Tongits commonly requires you to have already exposed at least one meld before calling Draw. The call is made at the beginning of your turn rather than after taking another card.
Sapaw can also affect the timing. If another player has just laid a card onto one of your exposed melds, your immediate calling window may be blocked under traditional rules.
So the first question is not “Can I beat them?”
It is:
Am I actually allowed to call right now?
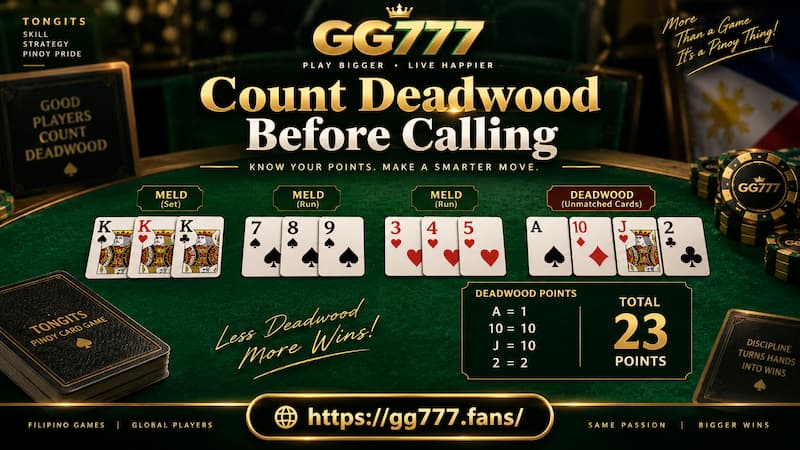
Count Deadwood Before Calling
Tongits Call decisions become much clearer once you stop counting cards and start counting points.
Count Deadwood Before Calling
Standard deadwood values are straightforward:
- Ace: 1 point
- Cards 2–10: Face value
- Jack: 10 points
- Queen: 10 points
- King: 10 points
Only the unmatched cards matter when comparing remaining deadwood.
This creates situations that often surprise newer players.
A hand with three loose cards can be stronger than a hand with only two.
A Four-Point Hand Against Fourteen
Imagine you reach your turn with these unmatched cards:
- Ace
- 3
Your deadwood is only 4 points.
Now compare that with another hand holding:
- 4
- Queen
That hand carries 14 points despite also having only two unmatched cards.
The difference is large enough to change how aggressively you should approach a Tongits Call.
High cards are especially dangerous late in the round. A lone King may look manageable because it is only one card, but it still contributes 10 deadwood points. A player holding 2, 3, and Ace has three cards yet only six points.
Count points first. Card quantity comes second.
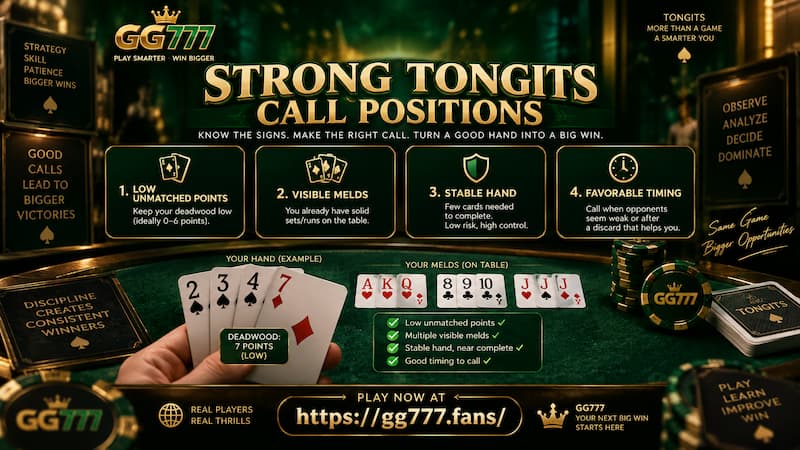
Strong Tongits Call Positions
There is no fixed deadwood number that guarantees a correct call. The strongest opportunities appear when several favorable conditions line up at the same time.
Strong Tongits Call Positions
Deadwood Is Already Low
Suppose your exposed melds are complete and you are left with 2 and Ace.
Three deadwood points is a strong position. Drawing another card could improve the hand further, but it could also change nothing while giving opponents another opportunity to reduce their own totals.
At some point, chasing perfection creates more risk than value.
A useful rule of thumb is to look at how much realistic improvement remains. Dropping from 18 deadwood to 8 is meaningful. Dropping from 4 to 2 may not justify giving two opponents another full turn.
An Opponent Looks Close to Finishing
Tongits gives you partial information. You cannot see hidden cards, but exposed melds, sapaw, and discards reveal plenty.
Consider an opponent who has:
- Two exposed melds
- Only a few cards remaining
- Successfully added cards to existing melds
- Discarded several high-value cards
That player may be close to Tongits or holding very little deadwood.
Waiting another round can become dangerous.
A Tongits Call may be preferable when your hand is already competitive and one opponent appears likely to improve quickly.
Opponents Have Limited Challenge Positions
Traditional rules often require a player to have opened with a meld before being eligible to challenge a Draw call.
That creates an important table-reading opportunity.
If one opponent has never exposed a meld, their ability to Fight may be restricted depending on the rules in use. If the second opponent has opened but appears to be carrying awkward cards, a call can become more attractive.
This does not make the result certain. It simply changes the risk.
When Waiting Makes More Sense
A good Tongits Call is not about being aggressive every time your hand becomes small. Some hands need another turn.
High Deadwood Is Still Exposed
Imagine reaching the late stage with only a King and a 3 outside your melds.
Two cards sounds excellent.
Thirteen deadwood does not.
Calling here can be dangerous because an opponent holding three low cards could easily beat you.
This is one of the most useful distinctions in practical Tongits:
A short hand is not always a low hand.
If your remaining cards contain a 10, Jack, Queen, or King, calculate their weight before treating the hand as ready.
The Next Draw Has High Improvement Value
Sometimes waiting is worth the risk because many cards can improve your position.
Suppose you hold 6 and 7 while an exposed or potential sequence makes 5 or 8 useful. Several ranks may help you reduce your deadwood or form another valid combination.
That is different from holding Queen and 2 with no obvious connection.
Before calling, ask yourself how many realistic cards improve the hand substantially. If several outs exist, another draw may be justified. If only one unlikely card saves you a few points, calling now can be stronger.
Sapaw Changes the Calling Window
Sapaw is more than a way to get rid of a spare card. Used at the right moment, it can interfere with an opponent’s plan to call.
Suppose another player has exposed a run of 6-7-8 and appears to be holding very few cards. You are holding the 9.
Laying that 9 onto the exposed sequence removes deadwood from your own hand. Under traditional rules, it may also prevent that opponent from immediately calling Draw on the following turn.
That single move can change the round.
One Extra Turn Can Be Valuable
The value of sapaw becomes clearer when the table is already close.
One delayed call may give you time to:
- Complete a meld
- Drop a high card
- Reduce deadwood
- Force a less favorable discard
- Reach Tongits before the opponent gets another clean calling opportunity
This is why exposed melds should never be treated as background information. They are active parts of the table.
Read Cards, Not Just Opponents
Body language matters in face-to-face games, but card information is more reliable.
Focus on what has actually happened.
Exposed Melds
Multiple completed melds usually mean less unresolved structure in a player’s hand. Someone with several visible combinations may be closer to a low deadwood total than a player who has opened only once.
Discards
High-card discards deserve attention.
If someone has already released a King, Jack, 10, and Queen during the round, there is a reasonable chance they are actively cleaning up expensive deadwood.
Repeated low-card discards can tell a different story. They may indicate that the player’s useful structure lies elsewhere.
You do not need to memorize every card. Track the ones that materially affect your own hand and the likely strength of the opponents.
Challenge Risk
Before calling, think about the players who can still Fight.
Your hand does not need to be perfect. It needs to be strong relative to the likely challengers.
If your deadwood is five and an eligible opponent has been reducing cards aggressively, the decision is close. If your deadwood is three and both opponents have shown messy, high-value discards, calling becomes easier to justify.
Rules for tied Draw comparisons can vary, so ties should never be treated casually. Under some traditional Tongits rules, a tie may favor the challenger rather than the caller.
Tongits Call on GG777
When playing Tongits through GG777, use the rules shown for the specific game version as the final authority. Online implementations may handle Call eligibility, challenge conditions, tie resolution, scoring, or PHP stake settlement differently from a home game.
Game rules and platform rules are not the same; account-level requirements are covered separately in terms and conditions.
Before committing to a call, check four details:
- Whether you are currently eligible to Call Draw.
- Which opponents are allowed to Fight.
- How equal deadwood totals are settled.
- How the result affects the current PHP stake or scoring format.
That small rules check prevents a technically strong hand from becoming a avoidable mistake.
A Three-Step Tongits Call Check
A strong Tongits Call can usually be reduced to three questions.
Check Eligibility
Confirm that your meld status and recent sapaw activity allow you to call.
Check Deadwood
Count the points exactly.
Do not estimate.
A hand with Ace and 4 is five points. A hand with King alone is ten. The visual size of the hand can be misleading.
Check the Cost of Waiting
Think one turn ahead.
Call When the Balance Favors You
If your deadwood is already low, your opponents appear close to improving, and another draw offers little upside, calling now often makes sense.
If your deadwood is still heavy, several useful cards can improve the hand, or your calling eligibility is blocked, waiting is usually stronger.
Tongits Call timing is ultimately a balance between hand value and opportunity cost. The best calls rarely come from excitement. They come from knowing exactly how much deadwood you are carrying, reading the information already on the table, and recognizing when one more turn helps your opponents more than it helps you.